Skip to product information
1 of 1

Sculpey Premo™ Mermaid Trinket Dish and Fish Charms

Sculpey Premo™ Mermaid Trinket Dish and Fish Charms

Designed by Heather Robertson
Read More
Have you tried using polymer clay in silicone moulds? 
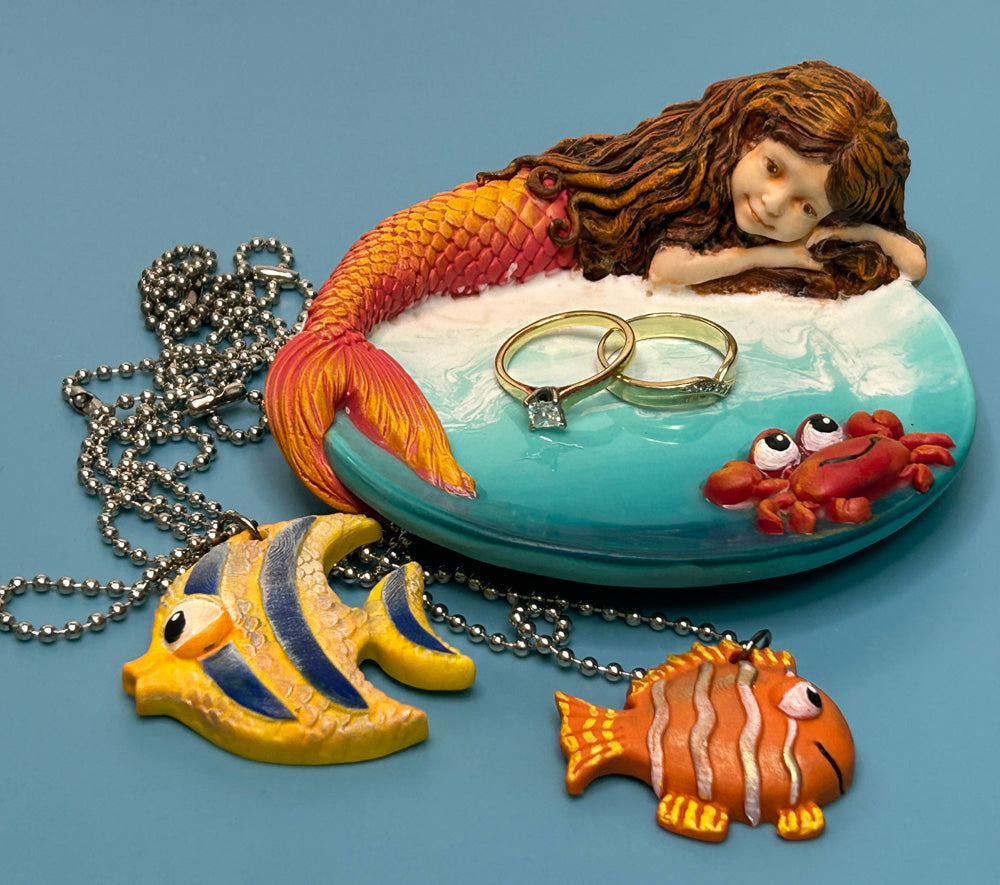
In this tutorial we’ll be showing you how to create a cute little mermaid trinket dish and fishy necklace charms featuring Sculpey polymer clays, and some Katy Sue Designs moulds from the Under the Sea collection. TIME TO COMPLETION: About 3 hours
Read Less
ADDITIONAL SUPPLIES
  • 3D Mermaid Silicone Mold (Katy Sue Designs)
  • Fun Fish Silicone Mold (Katy Sue Designs)
  • Turtle and Crab Silicone Mold (Katy Sue Designs)
  • A shallow glass or metal bowl
  • Your favorite sculpting tools
  • Jewelry findings – jump rings and chain or cord, and jewelry pliers. 
  • Oven
  • Sandpaper
  • Acrylic paint markers – white, yellow, blue, and black
  • Acrylic paint and paint brushes - burnt umber, burnt sienna, white, yellow, orange, and black
  • Gold and silver gilding wax
View full details
Project Instructions

Step 1

Getting Started:

Please make sure your work area is covered and you are not working on an unprotected surface. We recommend working on the Sculpey® Oven-Safe Work Mat, wax paper, metal baking sheet, or disposable foil. Uncured clay may damage unprotected furniture or finished surfaces. Be sure to cover your crafting area appropriately.

Start with clean hands, unwrap and knead clay until soft and smooth, or condition by running clay though a Pasta Machine. We recommend using a designated machine for clay purposes only. When working with multiple colors, clean hands with soap and water or baby wipes (we have found that baby wipes work best) before switching colors. Shape clay, pressing pieces firmly together. Wash hands after use.

Baking (also called Curing):

Begin by preheating oven to 275 °F (130 °C). After you are done creating; for best results bake/cure clay on an oven-proof surface such metal, aluminum foil, an index card or the Sculpey® Clay Mat at 275°F (130 °C) for 30 minutes per 1/4" (6
mm) thickness according to package directions. Oven safe glass or ceramic
surfaces are also acceptable for baking/curing; however please note that the
baking/curing times may take longer as the glass or ceramic surfaces take
longer to heat up. For best baking results, use an oven thermometer. DO NOT USE
MICROWAVE OVEN. DO NOT EXCEED THE ABOVE TEMPERATURE OR RECOMMENDED BAKING TIME.

Step 2

Making the trinket dish:

Create a skinner blend using Premo Sculpey Peacock Pearl and white on the thickest setting of your pasta machine, then cut this into a large circle which we will use to make our trinket dish.


If you want your dish to be thicker, add another layer of clay on top of the
first layer by rolling out another sheet of clay using the scraps. Place this
on top of the skinner blend and use a rolling pin and light pressure to make
sure the two layers are bonded together.


Cut the circle again to your desired size.

Step 3

This trinket dish will be almost flat with a very small lip around the outer edge.

Use a shallow glass or metal bowl as a former and place your large circle of clay face down onto the outside of the bowl, then centre and place the smaller circle of clay on top to form the base of the dish.

Bake this in the oven, following the baking instructions on the clay packaging.

Once baked and cool, carefully remove the trinket dish from the glass or metal bowl former.

Sand and smooth any rough edges with some sandpaper.

Step 4

Creating the mermaid:

NOTE: We will create our little mermaid using the Katy Sue Designs 3D Mermaid silicone mould. When using polymer clay in a silicone mould it is important to condition the clay well so that it is warm and soft. This will enable us to get the clay into and out of the mould more easily.

Condition the mould by rubbing a very small amount of lip balm/petroleum jelly into the mould. This will help release the clay from the mould.

Step 5

Firmly press a small amount of clay into the face of the mermaid, then fill the rest
of the mould with the remaining clay. Trim away any excess clay with a blunt blade, being careful not to cut the mould. Give the mould a little squeeze and wriggle, and carefully remove the mermaid head section from the mould.

Step 6

For the tail, mix some coral or light orange coloured clay together by mixing some Premo fuchsia, cadmium yellow and white.

Condition the tail section of the mould with a little lip balm/petroleum jelly.

Roll the coral colour clay into a sausage, and press this firmly into the mould.

Trim off any excess clay, being careful not to cut the mould, then gently wriggle and squeeze the mould to release the tail cast.

Step 7

Note: You may need to trim one side of the trinket dish to make a flat area for the
mermaid to lie down on, if it has too much of a lip, as the mermaid has a flat
base. 

Attach the mermaid head to the trinket dish using a little liquid clay and blend this onto the dish. You may need to redefine the area by her hair so that the tail slots
into the recess.

Step 8

Using a little Liquid Sculpey, attach the mermaid’s tail to the trinket dish and to the mermaid’s head. Play around with the position of the tail and add extra texture to fins if desired.

To help blend the tail to the head, roll out some thin snakes of clay to add a few extra curls of hair.

Step 9

Condition the hair section of the mould with a little lip balm/petroleum jelly and cast the hair using the same colour that was used for the head.

Use a little Liquid Sculpey to help attach this to the back of her head. Blend the edges together and redefine the curls. Add extra curls if desired.

Mould a little crab using the Turtle and Crab silicone mould and attach this to the front of the trinket dish with a little liquid clay.

Bake this in the oven, following the baking instructions on the clay packaging.

Step 10

Adding sea foam:

Add a little extra seaside flair to the trinket dish by creating some water and sea foam.

Empty the bottle of Liquid Sculpey clear into a clean jar and mix it well, making sure that all the liquid and solid components are combined. Mix until smooth.

Add a small amount of this to the trinket dish and spread this evenly using a small
paintbrush or your fingers.

Add a few thin and squiggly lines of Liquid Sculpey white onto the dish, closest to the mermaid, then swirl this into the Liquid Sculpey clear using a needle tool to create the impression of sea foam.

Bake this in the oven, following the baking instructions on the clay packaging, and leave to cool.

Step 11

To add extra shine and clarity to the Liquid Sculpey clear, give it a little extra heat
blast from a heat gun until it goes extra clear and shiny.

Step 12

Painting our mermaid and crab

Add the finishing touches to your little mermaid using a little acrylic paint.

Paint the mermaid’s hair with a base layer of burnt umber.

Paint the crab’s eyes and mouth using a little white and black.

Step 13

Dry brush a little white paint over the top section of the tail and the edge of the tail
fins. When dry, dry brush a thin layer of yellow over the entire tail. Yellow
paint is translucent, so as it dries the yellow will appear brighter in the
areas where it is layered over the white paint.  

Dry brush a little yellow paint to add a few highlights to the crab.

Step 14

Dry brush a mix of white and burnt sienna over the hair to add definition to the curls.

Step 15

Mix a little burnt sienna and white together to make a flesh tone colour a slightly darker than our mermaid’s face. Paint a thin layer of this over her face and arms, and then remove most of the paint with a damp cloth so that the paint only remains in the recesses and creases in her face. This will define all her features and give her face a sun-kissed look. Paint a small amount of this darker mix on her bottom lip.

Step 16

Paint the eyes using a little burnt umber. Only paint a small section of the top lid and the iris. You don’t need to paint too much detail as the eyes are so small. Using a
pin and some white paint, add a small highlight to each eye to bring our
mermaid to life.

Step 17

Making the Fish Charms:

Let’s create some Fun Fish necklace charms to add to our trinket dish.

Condition the mould by rubbing a small amount of lip balm/petroleum jelly into the mould. This will help release the clay from the mould.

For this we will need the Katy Sue Designs Fun Fish mould and some yellow and orange clay. We have used a mixture of Sculpey Premo cadmium yellow, fuchsia and white.

Cast one fish at a time as this will make it easier to release them from the mould. Press the clay firmly into the mould and trim off any excess clay, being careful not to cut the mould, then gently wriggle and squeeze the mould to release the fish.

Make a small hole at the top of each fish, so that that we can add a jump ring later.

Bake the fish in the oven following the baking instructions on the clay packaging and allow to cool.

Paint and decorate the baked/cooled fish using acrylic paint markers, acrylic paint, or a combination of the two.

Add some metallic shimmer and shine to the fish using a little gold and silver gilding wax.

Complete your fishy necklace charms by adding a jump ring to each fish, using the holes that we made earlier, and a chain or cord.

Step 18

Here's a look at my finished bowl and pendants!